loading...

March 11, 2026

Snowflake Architecture Explained:

I Set Up a Data Warehouse for a Car Wash Business in 30 Minutes

Most people think Snowflake is just a cloud database. It’s not. It completely separates storage, compute, and access control — and that changes everything about how you build data systems. Here’s how I set it up from scratch using a real car wash membership dataset.

Why I Built This

I’m working through a 6-part project series to build a complete analytics data warehouse — the same kind of system used by companies that rely on data engineering to power its member lifecycle, CRM segmentation, and KPI dashboards.

The goal is simple: build it in public. One phase at a time. Blog post, YouTube video, and LinkedIn post for each. By the end of Phase 6, I’ll have a fully functioning data pipeline from raw CSV files to a live reporting layer — and a portfolio piece I can actually show.

This is Phase 1: getting the Snowflake environment right from the start.

🗂️  What You’ll Learn in This Post

How Snowflake’s 3-layer architecture works (storage, compute, access). How to set up a production-style environment with separate databases, schemas, and roles. Why these decisions matter — and what happens if you skip them.

First, Understand What Snowflake Actually Is

Before you run a single SQL statement, it’s worth spending 5 minutes on architecture — because Snowflake is genuinely different from a traditional database, and understanding why will shape every decision you make.

The Three-Layer Separation
  1. Storage layer: Your data lives as compressed columnar files in cloud object storage (S3, Azure Blob, or GCS depending on your cloud provider). Snowflake manages this for you. You never touch the files directly.
  2. Compute layer (Virtual Warehouses): This is what runs your queries. A warehouse is a cluster of compute nodes that spins up on demand, runs your SQL, and then suspends when idle. You pay by the second, only when it’s running.
  3. Cloud services layer: Metadata management, query optimization, authentication, and access control all live here. This runs continuously but is included in your account — you don’t pay extra for it.

💡  Why This Matters for Real Teams

The compute/storage separation means you can run multiple warehouses against the same data simultaneously — a data engineering warehouse loading new data, an analytics warehouse running reports, and a dashboard warehouse serving your BI tool — all without them competing for resources. This is architecturally impossible in traditional databases like MySQL or Postgres.

What I Noticed About the New Snowsight Interface

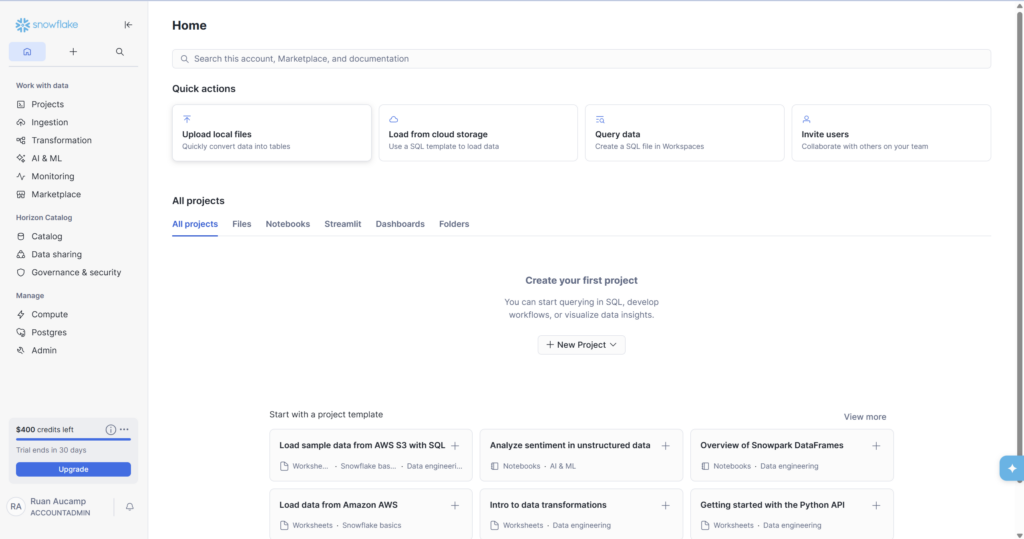
Snowflake recently upgraded its UI to Snowsight Horizon — and it’s a significant improvement. The Home screen (Screenshot 1) shows Quick Actions at the top for common tasks like uploading files and querying data, a Projects section for organizing your SQL files and notebooks, and $400 in trial credits with a 30-day countdown at the bottom left.

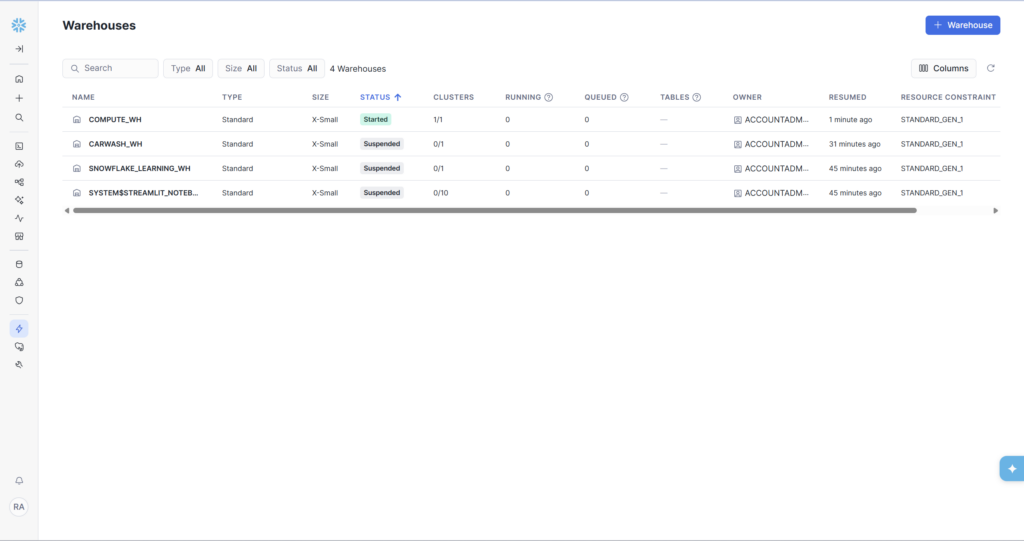
One thing worth noting: you’ll see a ‘COMPUTE_WH’ already exists in a fresh account. This is Snowflake’s default warehouse. We’re creating our own dedicated CARWASH_WH instead of using it — this is good practice for keeping project resources cleanly separated.

Step 1: Create the Warehouse

A Virtual Warehouse is the first thing to create because everything else depends on compute to run. Open a new SQL worksheet (Projects → Files → Add new) and run:

Three settings here are worth explaining:

  • X-SMALL is 1 credit per hour — less than a cent per typical query. More than fast enough for development and learning.
  • AUTO_SUSPEND = 60 is the most important cost-control setting. The warehouse stops charging the moment it’s been idle for 60 seconds. Without this, it runs continuously.
  • INITIALLY_SUSPENDED = TRUE means it doesn’t start until you actually run a query — no accidental charges on creation.

After running the script, navigate to Admin → Warehouses to see your warehouse alongside the default ones. CARWASH_WH shows as Suspended — that’s exactly right. It will auto-resume the moment a query runs against it.

Step 2: Create the Databases

This is where most beginners make their first structural mistake: using a single database for everything. I’m creating two separate databases from the start — one for raw data, one for clean analytics data. This mirrors how production data teams structure Snowflake.

🤔  Why Two Databases?

Raw data is immutable — it’s what arrived from your source systems. If a transformation has a bug, you can always re-run it from raw. If you overwrite raw data with your transformations, that recovery option is gone. Separating raw from analytics is one of the most important conventions in data engineering, and it costs you nothing to set up correctly from the start.

The SHOW DATABASES query returns 2 rows confirming both databases exist — created just seconds apart as you can see from the timestamps in the results. The Database Explorer panel on the left immediately updates to show CARWASH_ANALYTICS and CARWASH_RAW alongside the system databases.

Step 3: Create the Schemas

Schemas are namespaces within a database — they let you logically group related tables. Think of a database as a building and schemas as floors: you wouldn’t put the accounting department and the engineering team on the same floor without organization.

The schema design reflects how data flows through the system:

  • POS, CRM, and LOCATIONS in CARWASH_RAW mirror the source systems that will eventually feed data in. Keeping them separate means a bug in CRM data loading can’t accidentally corrupt POS data.
  • STAGING in CARWASH_ANALYTICS is where raw data gets cleaned and typed — nulls handled, column names standardized, data types enforced.
  • MARTS is where the real analytics models live: dimension tables, fact tables, and the member lifecycle model we’ll build in Phase 5.
  • REPORTING is the outermost layer — simple views that translate the mart models into dashboard-ready outputs.
Step 4: Create the Roles

Role-based access control is the part most beginners skip — and the part that causes the most problems on real teams. Even working solo, building with roles from the start means your environment is ready for collaboration, and it forces you to think clearly about who should be able to do what.

Three roles, each with a different permission footprint:

  • DATA_ENGINEER: full access to both databases. This role builds and maintains the pipeline.
  • DATA_ANALYST: read-only access to the analytics database. They can query clean data but can’t modify it or touch raw sources.
  • REPORTER: the most restricted role — can only see the REPORTING schema, which contains the polished views. Ideal for dashboard tools or external stakeholders.

Once the grants run, you can verify them visually by clicking on a database in the Horizon Catalog. CARWASH_RAW shows DATA_ENGINEER with full privileges (APPLYBUDGET, CREATE SCHEMA, MODIFY, USAGE, etc.). CARWASH_ANALYTICS shows both DATA_ANALYST (USAGE) and DATA_ENGINEER (full), exactly matching the intent of the design.

What We Built — Phase 1 Complete

In about 30 minutes, we went from a blank Snowflake trial account to a properly structured data warehouse environment. Here’s the full inventory:

✅  Phase 1 Deliverables — All Complete

  • CARWASH_WH — X-Small warehouse, auto-suspend 60s, auto-resume
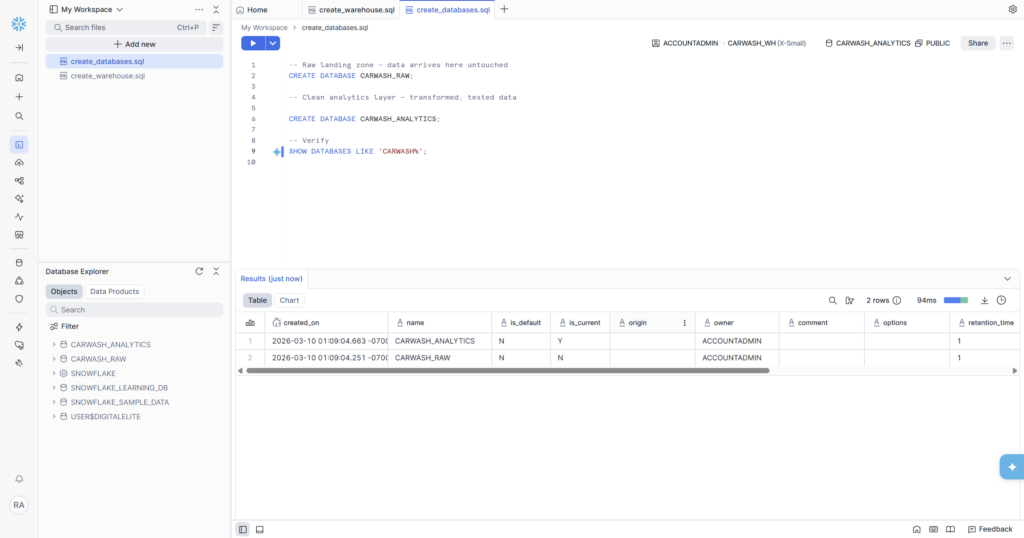
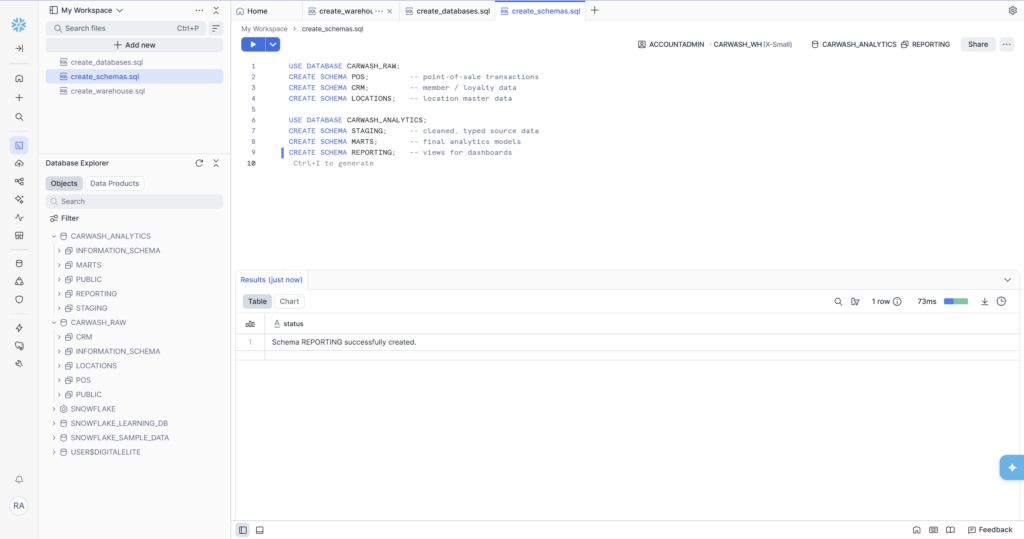
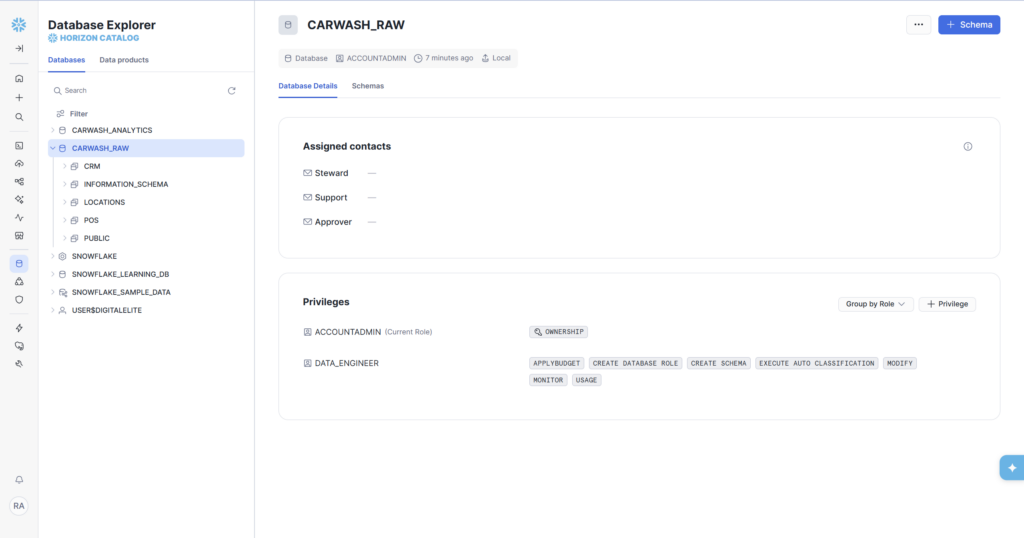
  • CARWASH_RAW — Raw database with POS, CRM, LOCATIONS schemas
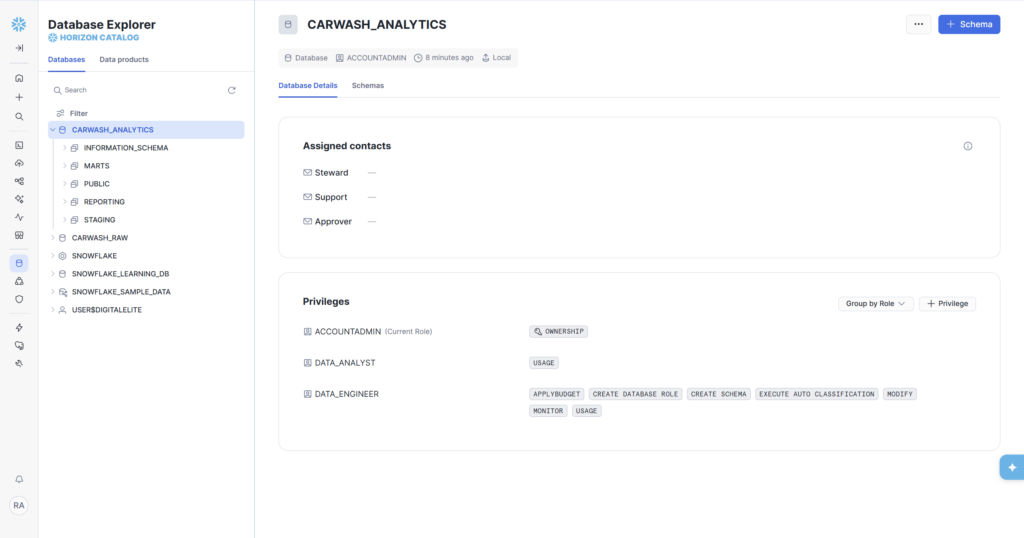
  • CARWASH_ANALYTICS — Analytics database with STAGING, MARTS, REPORTING schemas
  • DATA_ENGINEER role — full access to both databases
  • DATA_ANALYST role — read access to CARWASH_ANALYTICS
  • REPORTER role — scoped to REPORTING schema only

• SQL files saved in Snowsight workspace (create_warehouse.sql, create_databases.sql, create_schemas.sql, create_roles.sql)

What’s Coming in Phase 2

Now that the environment is ready, Phase 2 is all about table design. We’ll create the five core tables that model a real car wash business:

  • LOCATIONS — where each car wash site is
  • MEMBERSHIP_PLANS — the BASIC, DELUXE, and ULTIMATE wash tiers with pricing
  • MEMBERS — customer records with enrollment date, plan, and status
  • VISITS — every car wash visit, linked to a member and location
  • TRANSACTIONS — billing events: signups, renewals, upgrades, and chargebacks

We’ll cover dimension vs. fact table design, Snowflake data types, and why the _loaded_at audit column you’ll see in every table is not optional in a real pipeline.

📁  GitHub Repo

All SQL from this series is available on GitHub at github.com/aucampr/snowflake-carwash-analytics. The Phase 1 scripts are in the /setup folder. Star the repo to follow along.

Follow Along

This is part of a 6-phase series building a complete Snowflake analytics data warehouse — from blank account to live KPI dashboards — using a car wash membership dataset. Each phase ships as a blog post, and a LinkedIn post.

Posted in Beginner, Career, Data Engineering, Data Warehouse, Snowflake, SQL